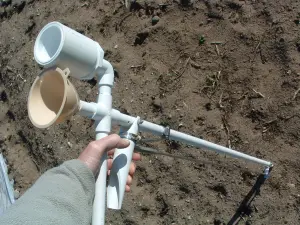
- My Seed Planter
I was able to cobble together a hand held seeder out of PVC pipe and a few other pieces of hardware. I’m expecting that it will work for medium to large-sized seeds like beans, corn, peas, pumpkins, squash, and, most importantly for me, sunflowers.
Here’s how it went.
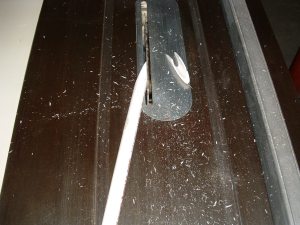
- Cutting the Bottom
With a table saw, I shaped one end of a 1/2 inch PVC pipe to a V-shaped point. I’ll call this the downpipe and its length will depend on how tall you are. I was shooting for it to end up a little above waist level, and I’m fairly tall, so mine ended up being 41 inches long.
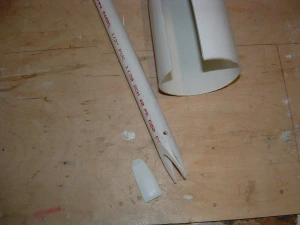
- The small piece was part of the big pipe.
Out of a piece of 4 inch PVC pipe I shaped a strip to close off one side of the V-point at the bottom. I used PVC cement to attach it, and I’m thinking that it may be the weakest link in the machine. Time will tell if it will withstand repeated jabs into the soil.
To close off the other side of the V and, more importantly, to open and let a seed drop out, I fashioned a flipper out of a piece of steel. Getting a useful piece of steel is probably the hardest part of the project. You want to be able to bend it, but not so easily that it will come unbent halfway down a new row of corn. It helps if you’re a bit of a pack rat and collect odd materials for future use, but hardware stores will probably have something you can use. Using a jig saw is an easy way cut the steel, but a hack saw is fine too.
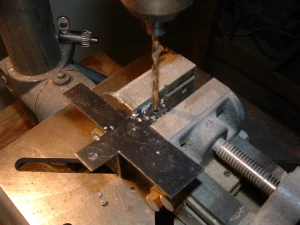
- Flipper Cut Out Being Drilled
The flipper starts out being cross-shaped. The side arms are drilled for a pivot bolt and then bent down to wrap down over the pipe. The top arm is then bent up to make a lever to attach a pull rod. This rod will pull the flipper open to drop out the seed.
Some shiny paint has been added and you can see how the flipper fits on the bottom and attaches to the pull rod.
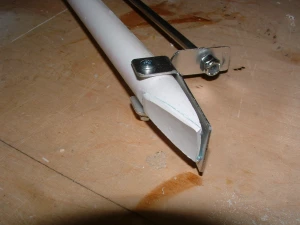
- The business end of the planter
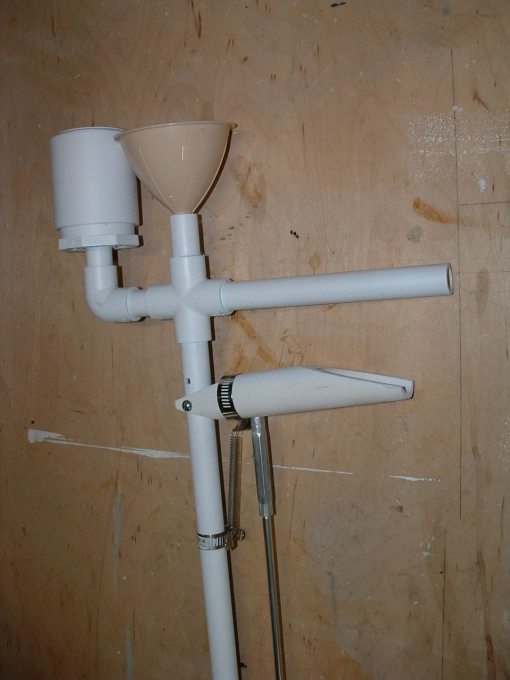
- The Top End
The funnel is to guide a dropped a seed into the pipe, and next to it is a cup made out of a 2 inch PVC coupling sitting on a 2″ male x 1/2″ female PVC bushing. A 4 oz Yoplait yogurt container fits perfectly into the coupling, closing off the hole in its bottom and it holds the seeds.
The handle is made of two parts. The lower piece is attached to the top of the pull rod and to a spring, so that squeezing it upward pulls the flipper open and drops a seed. When it’s released, the spring pulls it back down, closing the flipper. This piece is made of 1 inch PVC so as to be big enough to wrap around the 1/2 inch downpipe. The ends of this were angled in the table saw in the same way as the bottom of the downpipe.

- Parts Layout
The individual pieces are shown above, and all together below.

- Done
Update, June 18, 2012
The seeder has been working quite well, but there are a couple of things that I would do differently next time.
First, the seed holding cup is too deep and too narrow. When I reach in, it’s hard to grasp the seeds with the tips of my fingers.
Second, the two machine screws that go through the middle of the drop tube can sometimes catch bigger seeds, especially flat ones like pumpkin seeds. Once one gets caught, the next ones tend to get caught too, and before you know it, you’ve gone a few feet down the row with no seeds planted.
If I get ambitious someday, I may redo these two things, but if you are going to build one, it would be worth doing them a little bit differently. Maybe a bigger diameter drop tube would be a good idea, so the seeds wouldn’t get caught as easily. The seed cup could be sawed off to make it half as tall, and that would probably solve that little problem. If anyone has other ideas, I’d love to see them here.

Comments on: "Homemade Garden Seeder" (21)
I made me one of these garden seed planters a couple of years ago.. I am seventy and It lets me plant without bending down….Do you have one on the market yet and if so, I could sell the hell out of them…
Hey, Don, I hear you about not bending over. I’m not seventy yet, but I can see it from here. I don’t have any plans to make any more or market them. If you made one, then you know as much as I do about them, so why don’t you go ahead and start cranking them out?
Thank you.. I would have to set up with a sheet metal shop to cut out the stainless steel for the point, then I would have to find a supplier for the rods that are only threaded on each end. (my thread rod bends) The I may think of using emt electrical metal tubing for the down spout and then making the movable handle with 1″ pvc.. I could try theis and make a hundred of them then think about spending some money on getting it pattened. What you think? And thank you for the pictures because mine is made like your pictures and works great.. Cant use it in wet soil………………………….don
What I did to prevent the seeds from hanging up on any of the screws i used on the handle hindge and the spring ancure and the lower pivit point was to take some small self tapping screws that have the washer built into the screw and install them, remove then then grind of just the tip of the serew so the inside of the pipe is clear of all obstructions. At the same time I just took an old apprin form the house, sewed it up after folding it with the top open and put it on, put my seeds in it and it was at waist higth. Works good for me and my wife.
Sorry about my spelling…………….don
Don, it sounds like yours probably works better than mine. I thought about using self-tapping screws, but I was afraid that the thin plastic pipe wall wouldn’t be enough to anchor them and keep them from backing out as I used the seeder. Glad they are working for you. I like your apron idea instead of the seed holding cup. I have some old carpenter’s nail aprons that would probably work too.
I don’t know much about getting a patent, but I think it’s expensive, and if you don’t have the dough to take people to court who violate it, a big company could steal it from you if they wanted to. Still, it might be worth doing. I dunno.
I’m really glad to hear that this seeder has worked for you. I just put it out there on the internet hoping someone could use it. So far, I haven’t heard that anyone else has built one. It’s great that you did.
I thank you for the reply and comments.. I agree with you on the patent. Didnt think about having money to take anyone to court… Think I will make some, fifty or so, try to keep the cost down and open a website.. I was suppose to plant some black sunflowers and some cantalopes today,,but the rain got me… Got about eight hundred feet of rows maid but am in no hurry.. I know it is late for sunflowers but in south louisiana, I can plant whenever….thanks again…. How can I send you some pictures? Oh, another thing I did with the aprin instid of using a nail bag was to cut the top off of an gallon bleach jar about half way down so that it would stay open so that I could get a hand full of seeds without having my fingers used to open the aprin… I will keep you posted.. don
I like your bleach bottle idea. Pretty clever. Good luck with your manufacturing project and let me know how things are going. If you want to give me your email address, I’ll send you an email with mine.
donamy12@aol.com
Dear Sir / Sirs,
Please send me more details or your offer for Hand Seeder.
The seeder is needed for the planting of red beetroot seeds.
The size of beetroot seed is one millimeter and a half.
Do you have adequate seeder?
Do you have representatives in Europe?
Please send me a brochure of equipment
Thank you in advance,
Sincerely yours
I am sorry, but I have made only one of these, and have none for sale.
I don’t understand the need for the lever and pull-rod mechanism. It seems to me that if you stick the end in the furrow and drop a seed into the hopper it’ll plant itself in the ground…
Do you fill the hopper with seeds, and flip the flipper each time you move the planter the correct distance? Do you get only one seed this way?
They make a vibrator seeder that looks like a scoop for about $7. You could fill the scoop with seed; then as you move down the furrow, flick in one seed from the scoop into your funnel (It has a clicker wheel to make it vibrate). But that would be slower, wouldn’t it.
BTW, I’m Don Amy’s Texas brother.
Hi, Gary. I thought you might be related to Don when I saw your name. Sorry that Don ran into such bad medical problems.
The idea of the planter is that you don’t need a furrow. The pointed end penetrates the soil and the flapper opens to let the seed fall out.
Also, the hopper is only for holding the seeds in a handy spot. It’s closed on the bottom. You have to reach into the hopper and pull out seeds and manually drop them into the funnel one by one. I use it only for pretty big seeds that are easy to grab.
Thanks for writing.
So it is “no till”. Now that I understand how it works I really like it. I’m going to make one just like it, but with my funnel modifications for “bulk load” I describe below. The ope ration will be:
1. stick the pipe in the ground the proper depth (governed by the tin can lid depth control)
2. drop a seed by moving a lever on the funnel back and forth.
3. squeeze the hand lever to open the flapper to deposit the seed
4. move to the next space and repeat.
Hmm I wonder if there is a way to make one lever that does both operations. I know: microprocessor control with solenoids to operate the mechanisms. You could program in a time delay between “deposit seed” and “open flapper”. Now we’re really getting carried away.
let me know when you get it done. I’d love to see pictures.
You could make it “no till” by putting a collar that you could slide up and down the shaft near the pointed end to set the depth. Then you wouldn’t have to open a furrow to plant the seeds. Maybe a lid from a tin can. Cut an X in the center of the lid; push thru at the X with the pvc forcing 4 triangles to bend up from the center of the lid; add a hose clamp to hold it in place.
Or you could re-design the flipper. Instead of the point at the end, cut away half the pipe for about two inches at the bottom end. Then mount an L shaped piece of metal so that the seed would sit on the L before you pulled the trigger. (The L shaped part of the flipper would have to be pushed up the tube). When you pull the trigger, the other part of the L should block the tube while the seed is ejected. By bending the L to less than 90 degrees, it could partially block the tube in the resting position for smaller seeds. You’d have to figure out how to mount the L. You’d have to have an extension of one side of the L to connect the pull rod to. This might be difficult. The basic idea is to have a flap inside the tube shaped like an L. The bottom of the L catches the seeds. When you rock the L over, the upright part of the L moves to block the tube; capturing only one seed. I could be done, but I don’t know how to do it easily. Maybe cut a slit for about an inch at the cut-out at the bottom of the tube and slide in a half-inch L soldered to a nail. Put a hose clamp below the nail to hold it in place. You’d have to cut the L to match the shape of the tube (rounded). then you could bend the nail and use the bent part as a lever to attach your pull rod to. Hmmm, actually, the 2 inch part you removed at the bottom would have to be split at about the 80% mark (instead of half way) leaving only one wall about 1/4 inch wide. Then a slot about an inch up and the flap/bent nail slipped into the slot and held in place with a hose clamp. I think I’ll make one. Well, another modification. Instead of 2 inches at the bottom, you’d only need about three fourths of an inch for this to work. It would be difficult to make this design “no till”, except for seed depths more than 3/4 inch.
Actually, the best place to put the L shaped flap is on the funnel. Think about it. Put a disk about 1 1/2 inches in diameter with a hole slightly larger that the seeds in it near the edge of the disk. Have another thicker disk with a hole cut into it slightly larger than a seed. It must be thicker that the height of a seed. Set it over the first disk with a shaft thru the center of the two as a pivot. This fixture shouls sit about 1/4 up the cone of the funnel. one seed will be caught in the hole in the thick plastic disk. You’ll need a third disk with a notch in it that you can rotate over the hole to “capture” a seed. Rotate these two disks until the holes line up and the seed is deposited. Recap: Top disk is not blocking the hole in the thick middle disk. Bottom disk IS blocking the hole. Fill hopper. Rotate top disk to block hole. Rotate both disks until seed drops. Reverse rotate both top and middle disk to beginning position. Maybe I should patent this.Now figure out how to build the lever needed to make this a pull-push operation for each seed you want to drop.
You have a ton of ideas, Gary. I’d love to see you build one of these. Please do!
been in and out of here and kinda hard to catch up.. I still love my seed planter. If I were younger I think I would market it. It so nice to be able to put seeds in the ground with out bending over .. I only used mine one season but really enjoyed it.. ,,,,,,,,,,ty,,,,,don
Hi Don,
Glad to see you’re still with us!
can’t get rid of me.. Man I wish I could eat. I saw a picture of brockley and white chicken Alfado. . sorry about the spelling.