Five years ago I built a little greenhouse outside my basement door and thousands of mostly happy little plants have been grown in it since then. The chronicle of the project is here. I had to make it narrow to fit the available space and that has always been a problem, principally because the widest door I could fit into it was 22 inches wide — not good for getting any bulky items in and out of the basement. Also, I had added a sort of bump-out on the side of it to get more room, which it did, but that bumped up the ugly factor a little more than I could stand. I’m no longer growing flowers for the local farmers’ market, so I don’t need as much room as I did.
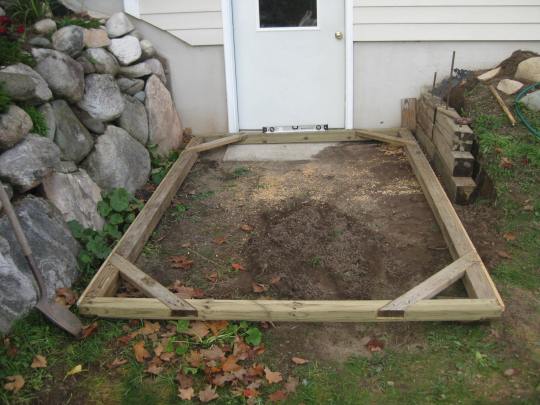
The old structure was 5′ x 10′, and by digging some dirt out on one side, I was able to stretch it out to 6.5′ x 10′, and raise the height to almost 9′ at the peak.
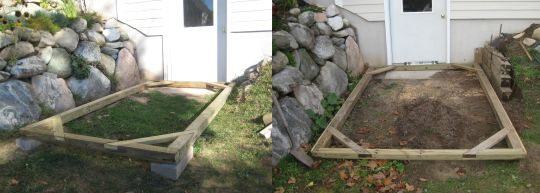
I was able to re-use the base sides and braces and make longer end pieces.
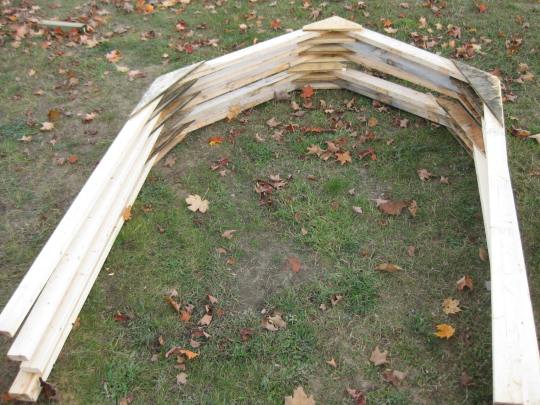
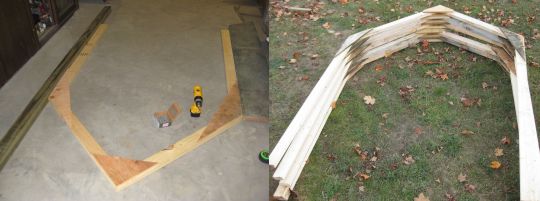
Only five frames this time instead of six. That gives 30″ OC spacing, compared to 24″ before. It turns out that snow load is not a big problem because it’s easy to knock the snow off from the inside. There’s no big buildup. The sides are also taller. I was able to salvage the plywood gussets and the two by fours for the roof from the old greenhouse.
Frames are up with longitudinal and diagonal braces — screwed to the base and to the house.
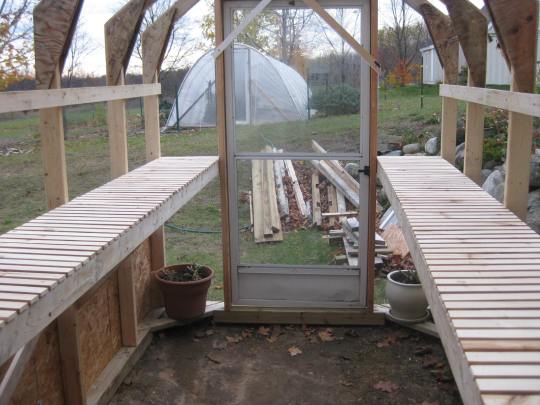
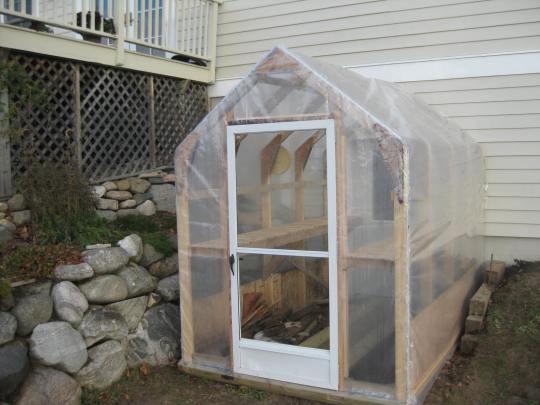
Showing my $20 storm door from the Habitat For Humanity ReStore. It’s 36″ wide (yippee) and is a way better door than the one I made for the original house.
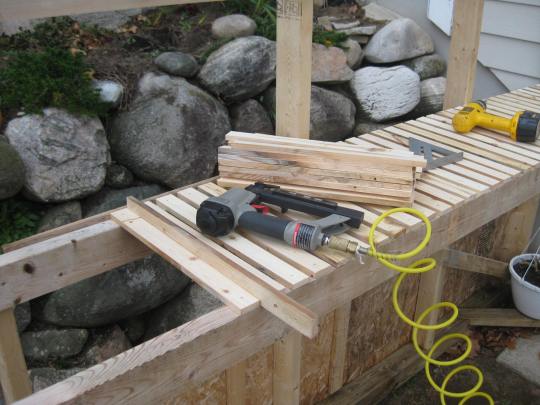
The old greenhouse shelving used something called metal lath, which I thought would be great because water and dirt would just fall right through. That was actually a good idea, but the stuff had sharp edges and I poked holes in the bottoms of too many plastic plant trays. Holes in trays were OK for greenhouse use, but not for in the basement where the seed starting happened. This time I decided to rip salvaged two by fours into slats and staple those down. I think I’ll like it better.
The right-hand shelf has a little warp, the result of using lumber salvaged from the first greenhouse, but what will that hurt? Nuttin’, Honey. I hadn’t noticed it until I looked at this photo.
And here it stands. Along with ten two-by-fours, I did have to buy some new plastic, due to the bigger size and the fact that the old plastic was five years old, one year past its stated lifetime.
A couple of details:
– I used aluminum channel and wiggle wire to fasten the plastic to the wall corners and gable ends.
– To seal the greenhouse to the siding of the house, I put duct tape on the siding and used foam to fill the gaps. The duct tape was to keep the foam from sticking to the siding. Someday, I will be moving the greenhouse and I don’t want to have to do a lot of scraping then.
Just for fun, I made some comparison pics, the original greenhouse on the left and the new version on the right.
As I write this in northern Michigan, we are having a rare sunny November day and the greenhouse thermometer is reading 100 °F. I wish I could say that will last.







Comments on: "Greenhouse Re-do" (34)
This is great and simple. I plan on doing something very similar at my house for me and my two little kids.
Thanks, Bruce. The best of luck with yours when the time comes.
Great job.
Thanks, Linda. Compliments are always appreciated.
Do you think your plan could be altered to become a lean-to greenhouse?? I have a perfect spot behind my garage and I would like a greenhouse attached there. If I can ever talk my husband into building me one!!
I think you could do that by building half of each frame and resting the top end against your garage. You probably would want to make the top piece longer than I did. Good luck with getting your husband to do it. I’m sure you can find a way. 🙂
Great job! My climate in southern maine is probably similar to yours….what temps do you get in the winter? Able to winter over any veg or plants? Or just season extending in fall and spring?
Thank you, Riley. In the winter, the temps in my greenhouse at night are about the same as outside, so I don’t try to keep anything alive in there. When things warm up in the spring, I move seedlings out of my basement into the greenhouse during the day and back in if the night will be cold. On a sunny day it will be 30 to 40 degrees F warmer in the greenhouse than outside. In the fall, I put a few plants in there, like basil, to help extend the season. The most fun part of having the greenhouse is being out there on a sunny winter day with snow all around and 60 degrees or better inside.
about how much did it cost for the first one this would work for our back door going to the backyard
I spent about $280. You could save some money by not using the special aluminum channels and wiggle wire. Strips of wood screwed over the plastic would work just about as well.
did you use a 45 degree angle for your rafter cuts?
also how long are your side walls and rafters?
The width of the greenhouse is 78″.
The side wall studs are 72″ long with square saw cuts on both ends.
The rafters are 48″ long with a 35° saw cut on the end that sits on top of the rafter, and a 55° cut at the peak.
With these dimensions, the rafter saw cut will be longer than the end of the stud it sits on, but just let it extend inward of the stud and there won’t be any problem. If you specifically want 45° angles at each end of the rafters, make them 55 1/8 ” long.
Hello,
I’m in the planning stage of building a greenhouse.
I’ve been considering building one very similar to yours, a 5′ x 10′ however without the A frame. You said you’re in Northern Michigan, well I’m in Sault Ste. Marie so we must have similar snow fall. Do you think a 1 foot pitched roof on a 5 foot wide greenhouse will be adequate to shed the snow?
Also, on your original greenhouse, can you estimate the weight of the base made from 4 x 4’s and the total weight of the finished greenhouse? We would like the option of moving ours around also.
Thanks for your help
I’m pretty sure that a 1 in 5 pitch wouldn’t shed much snow. Even mine doesn’t really shed the snow without some help. I usually just stand inside and thump the plastic with a broom, and the snow mostly flies or slides off. I really have no idea about the weight — maybe two to three hundred pounds for the whole thing.
Can you post the drawings with specific list of materials, sizes and building design?
Sorry, Cheri, I don’t have any drawings or lists. If you’re serious about building a greenhouse like mine, try to find someone with some building experience and have them look at my post. They’ll be able to quite easily figure out materials and how to build it.
Good luck.
Did you attach (with screws or nails) your greenhouse to the house? If not, do you have much wind in that area? I just showed this to my husband, trying to talk him into helping me build it & use it as a extra entrance to our front door which would help block the wind & snow from coming through our holely front door. It doesn’t look like you’ve attached it to the actual house, which would save us from asking our landlord to add it to the house. LOL
Sorry for taking so long to reply to you. I read your question right away and thought I’d get right back to it, but it kind of slipped my mind, such as it is anymore. The answer to your question is yes, it is attached to the house, though only with two screws. I did it to keep it as tight as possible to keep snow from blowing in in the winter. As it turns out, I don’t really use it in the winter, so it doesn’t matter much if it’s attached or not. Good luck getting your husband to go along.
Where did you get the plastic wrap you used as the outer skin on your greenhouse? Any idea of the brand name and thickness? TIA (Thanks In Advance). I am in Southern California and our winters are mild. This past winter, we were in the 20s at night for a week but usually our winter temps are in the 50-60 range and summer in the 90s and low 100s but cooling off to 60 at night. From what I see, the greenhouse cover is the most expensive item unless you find plastic as you did.
I got the plastic from Growers Supply. It’s a clear 6 mil plastic called Sun Master made for greenhouses. I would guess you could get it from other places too, but I haven’t checked. They say it will last for 4 years, but mine has lasted longer than that.
Hello, my name is Boston Patillo, I am 14 and attempting to build a greenhouse for myself. I was wondering if you had an exact measure from the bottom of the baseboard to the top of the peak? I really liked your design, and look forward to starting my project.
Hi, Boston. I’ll get back to you tomorrow (Sunday) with that dimension.
Hey Boston, I’m so sorry, but I totally forgot to get back here with that dimension. If you’re still interested and you see this, send me a reply and I’ll try to do better.
Nice one man! Is there anything fastening the side wall studs to the base? I’m not sure how to screw those side wall studs into the base when it looks like they’re just resting on it. Do the side support beams keep them from moving, or are they actually fastened somehow?
Hey, Albert. Thanks for your comment. The studs are definitely fastened to the base pieces. Each stud has two screws holding it down. They’re driven in on an angle so that each one goes into a side of the 2 x 4 and down into the base. You drive them through the narrow sides of the 2 x 4, not the wider sides. I probably used three or four inch screws. If they were nails, the method would be called toe nailing, and it’s a pretty common way to fasten studs to a base.
Looks great! I’d like to build something similar but will just be standing away from the house. You made beveled bottoms on your base for ease of movement and I’m curious, did you ever try moving it once built? If you did, how easy was it? And any tips for making it more mobile now that you’ve done it? I would like ours to be moveable as well. Not drastically, but the option would be nice.
Hi, Caroline. In fact, I have moved the original greenhouse away from the house and then back again once. It was fairly easy for me because I have a tractor, but I think it would have been a real challenge to do it by hand. It’s heavier than it looks, and I think it would take at least a few good friends to do the job. It would be clever to have some kind of wheels you could lower and raise as needed, but that is more engineering than I wanted to put into it. The only easy thing that would help a little is to use 2 x 4s as a base instead of 4 x 4s. I think they would be strong enough and you’d save a few pounds.
Good luck with yours, and let me know if I can help with any other questions.
I had a cactus greenhouse about 30 years ago that looked similiar to your one.The plastic covering had thin fiberglass strands to reinforce the plastic material.I never could find a hardware store that sold the reinforced plastic. The greenhouse was originally a gift from my neighbour. It lasted a long time after I obtained it.
Interesting. I don’t think I’ve ever seen that kind of plastic. I use some that has some kind of anti-UV treatment. It’s said to last five years, but mine has lasted longer.
[…] invernadero adjunto del jardín de Tom […]
This looks like a very good project, even thinking I could use scrap wood I have around here. I have been wanting a green house of any kind for years. Thank you for sharing.
Fran – I’m glad you liked the post and I hope it encourages you to make one of your own
[…] invernadero adjunto del jardín de Tom […]